
Presumptive Screening test
Phenolphthalein test (Kastel Meyer test)
The Kastle-Meyer test, often referred to as the phenolphthalein test, is a presumptive test used in forensic science to detect the presence of blood.
Brief History: A techniques for the detection of plant peroxidase was discovered by Joseph H. Kastle and Oliver March Shedd in 1901 which led to the development of the phenolphthalein test. Later in 1903 Meyer utilized the technique to identify blood and pus fluids, That’s why this technique is known as Kastle Meyer Test.
Principle: The principle of the Kastle-Meyer test, is based on the peroxidase-like activity of hemoglobin, the protein found in red blood cells. Hemoglobin has the ability to catalyze the oxidation of certain substances, like phenolphthalein (colorless in reduced form) in the presence of hydrogen peroxide (H2O2) resulting in the immediate appearance of a pink color.
The test relies on:
- Oxidation of Phenolphthalein: Phenolphthalein, which is colorless in its reduced form, is oxidized by hydrogen peroxide in the presence potassium hydroxide or sodium hydroxide to form a pink-colored compound.
- Catalysis by Hemoglobin: Hemoglobin, if present in the sample, acts as a catalyst for the oxidation reaction.
- Color Change: The appearance of a pink color within seconds to a few minutes after the addition of the Kastle-Meyer reagent indicates a positive result for the presence of blood.
The color change is due to the formation of the oxidized phenolphthalein compound, which indicates the presence of hemoglobin in the suspected sample.
Heme iron (Fe4+) + Phenolphthalein (colorless) + H2O2 → phenolphthalein (pink) + H2O + heme iron (Fe3+)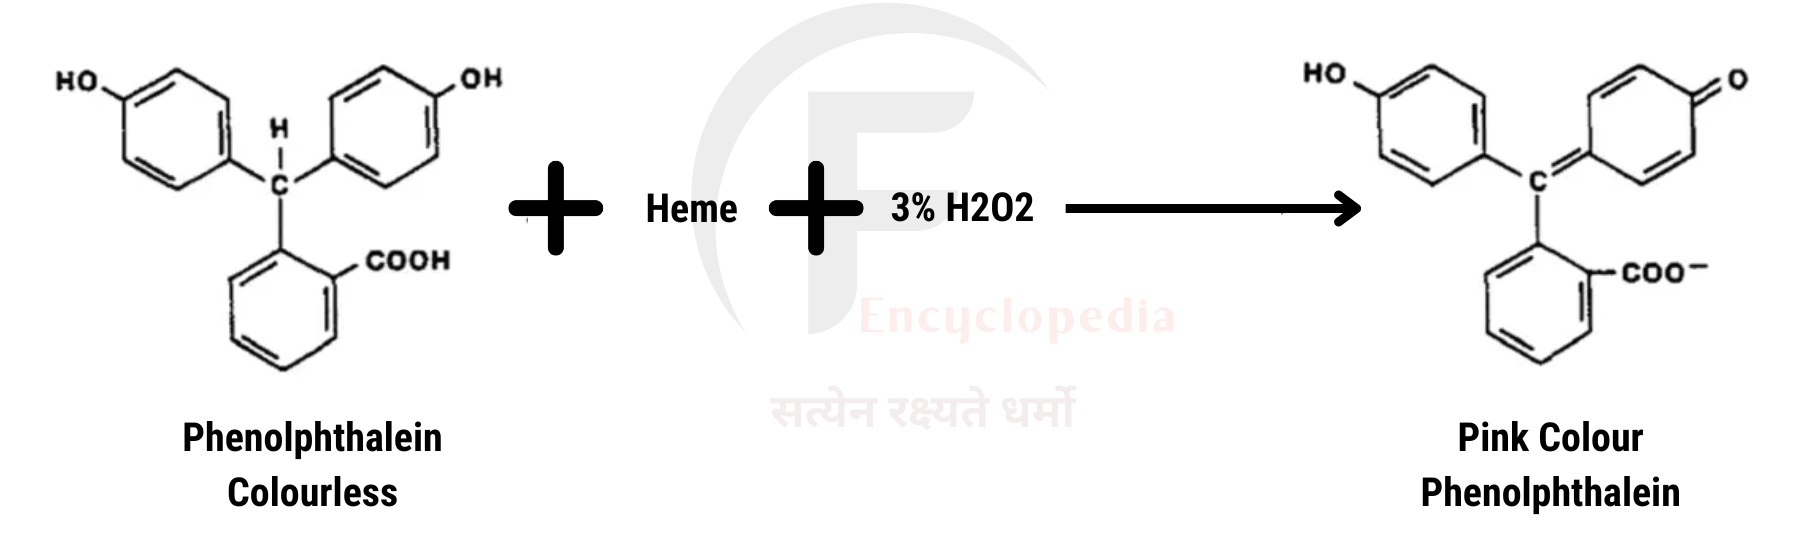
Reagent Preparation
Preparation of Stock Solution:
- Phenolphthalein 2.0 g
- Potassium Hydroxide 20.0g
- Distilled Water 100 ml
- Zinc Dust 20.0 g
Procedure
- In a test tube, dissolve 2.0 g of phenolphthalein with 20.0 g of Potassium Hydroxide in 100 ml of Distilled Water.
- Add 20.0 g of mossy zinc to the tube and mix.
- The solution should turn bright pink.
- Gently boil the solution until it changes color to become either colorless or pale yellow.
- Add water as necessary to maintain the volume during boiling.
- Allow the solution to cool.
Preparation of Working Reagent
- Solution 1: Ethanol 10 ml
- Solution 2: 2 ml Phenolphthalein Stock Solution + 10 ml Distilled Water + 2 ml Ethanol
- Solution 3: 3% Hydrogen Peroxide 10 ml
Test Procedure
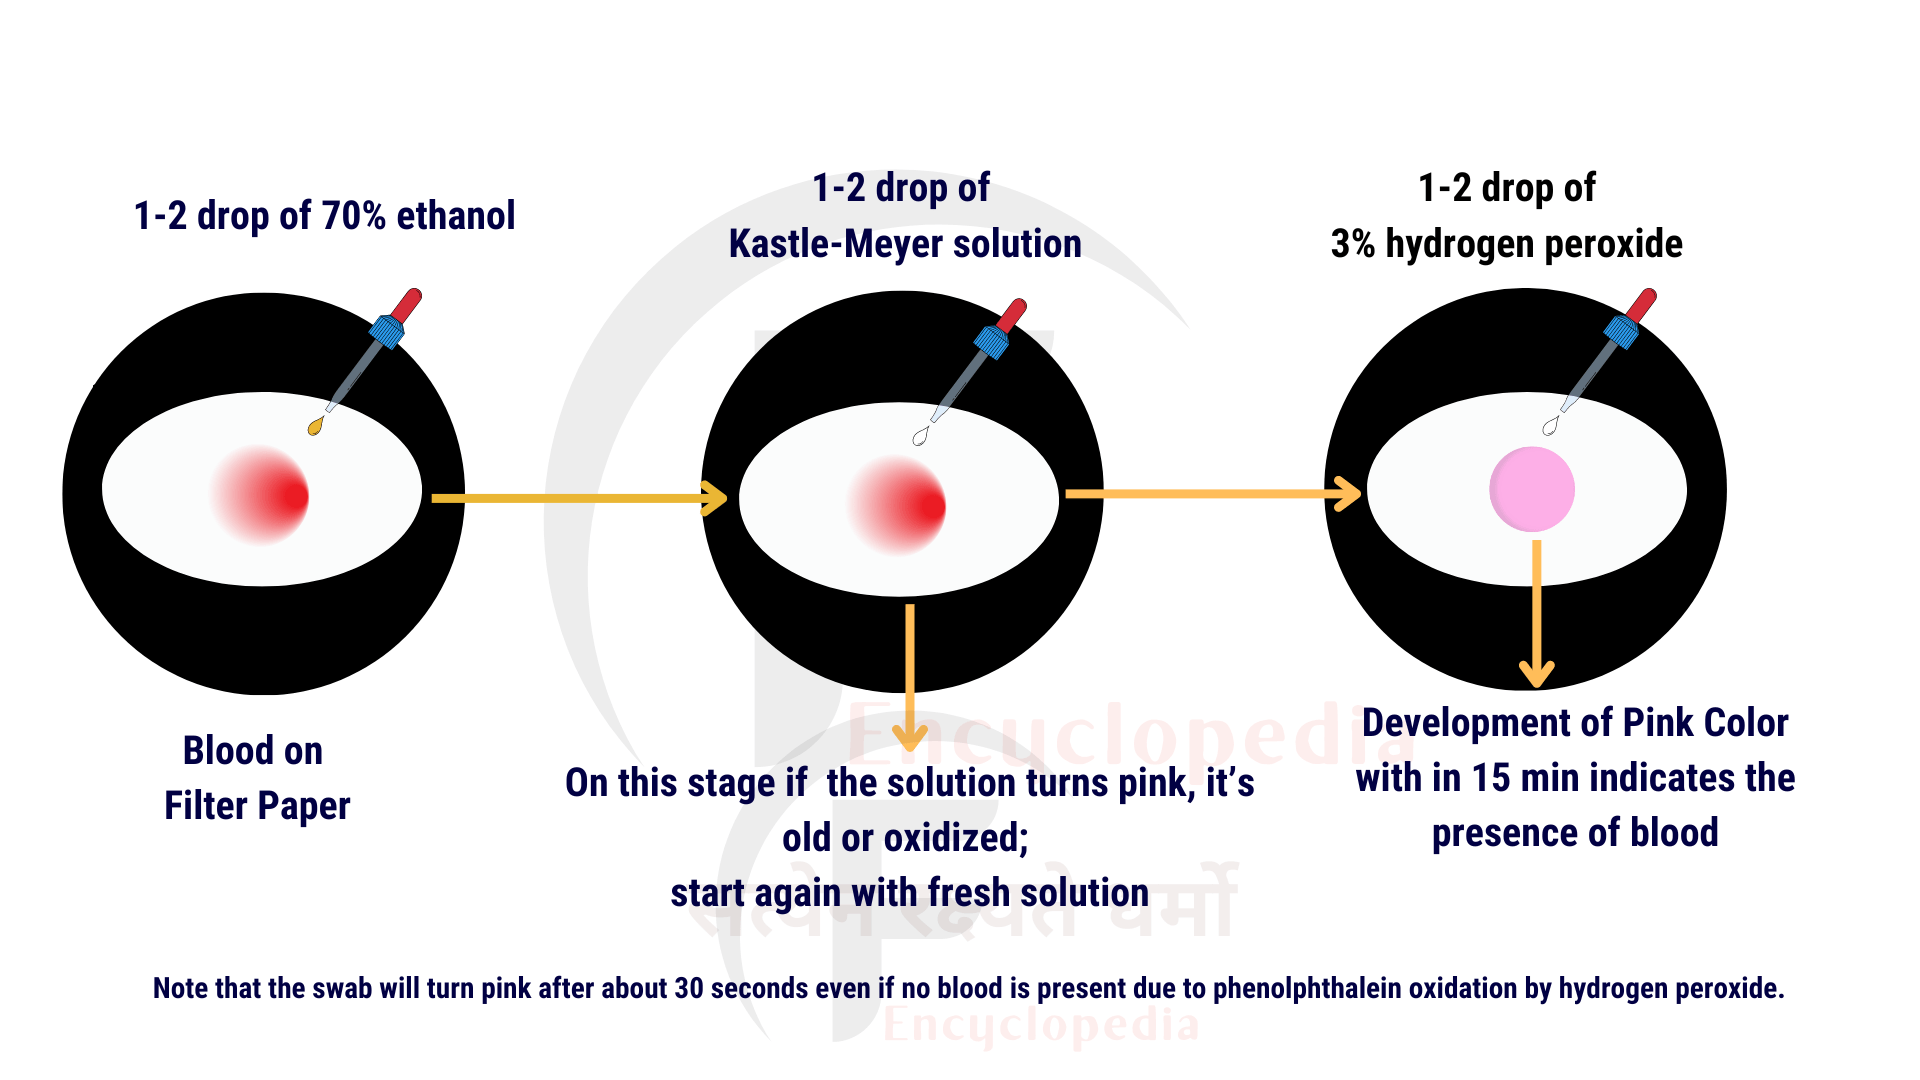
- Moisten a swab with water and touch it to the dried blood sample (no need to rub hard or coat the swab) or place a small cutting, swabbing or extract of the suspected bloodstain on filter paper or spot test paper.
- Add a drop or two of 70% ethanol to the swab (this exposes hemoglobin in blood).
- Add a drop or two of the Kastle-Meyer solution (should be colorless or pale yellow) (Note: On this stage if the solution turns pink, it’s old or oxidized; start again with fresh solution).
- Add a drop or two of 3% hydrogen peroxide solution.
Observation: If the swab turns pink immediately, it’s a positive test for blood. Note that the swab will turn pink after about 30 seconds even if no blood is present due to phenolphthalein oxidation by hydrogen peroxide.
Limitation
- False Positives: The Kastle-Meyer test can produce false positives when other substances with peroxidase-like activity, such as certain vegetables (e.g., horseradish), are present.
- A color change must be observed within 15 seconds due to the oxidative nature of the reaction. An unlimited detection time could lead to a false positive reaction.
- Color development before the addition of hydrogen peroxide may be due to a chemical oxidant present in the sample
- Interference: Substances like bleach or certain cleaning agents can interfere with the test, affecting its accuracy.
- Confirmatory Testing Required: While the Kastle-Meyer test is a useful presumptive test, confirmatory testing is necessary to definitively confirm the presence of blood and differentiate it from other substances.
Confirmatory test
Takayama Test
The Takayama Test, also known as the hemochromogen or pyridine hemochromogen test, forms distinctive pink needle shaped crystals in the presence of hemoglobin. This test has obtained its name from Masao Takayama who introduced the Takayama reagent (10% NaOH + Pyridine + saturated glucose solution + distilled water) in Japan in 1912.
Principle: Hematin reacts with Takayama reagents (contain pyridine- nitrogenous compound) and form insoluble pink colour needle shaped crystals.
Hemoglobin + Takayama Reagent → Heme + Globin + pyridine hemochromogen
Breakdown of the Reaction
Hemoglobin + NaOH → Heme + Globin
This reaction involves the breakdown of hemoglobin into its two main components: heme and globin. Sodium hydroxide (NaOH) acts as a strong base to disrupt the protein structure of hemoglobin, leading to the separation of heme (the iron-containing component) and globin (the protein component).
Heme + Takayama Reagent → Pyridine Hemochromogen/pyridine ferroprotoporphyrin
In this step, heme reacts with Takayama reagent to form pyridine hemochromogen.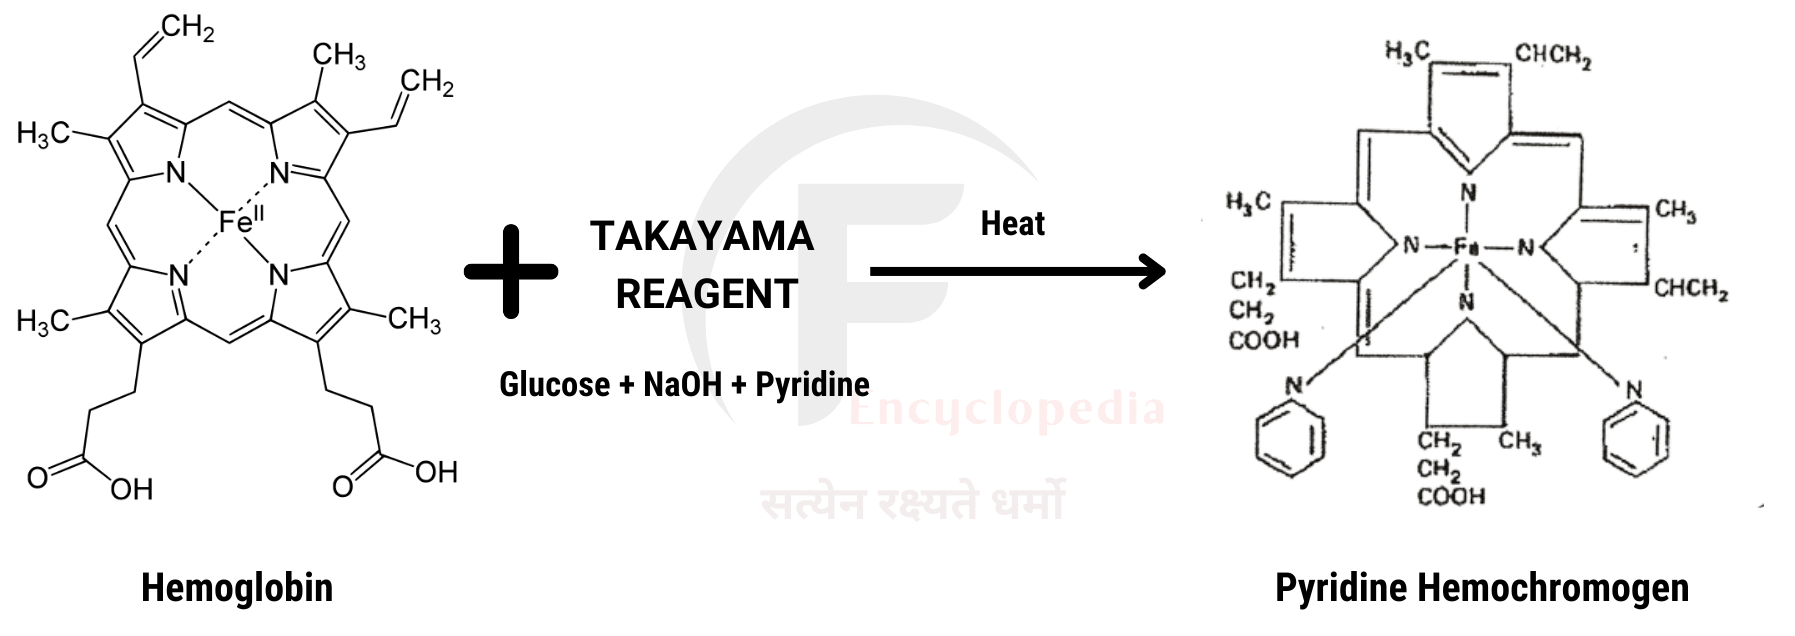
Reagent Preparation
- Standard Glucose Solution (100g/100ml) 3 ml + 10% Sodium hydroxide 3 ml + Pyridine 3 ml + Distilled Water 7 ml
Test Procedure
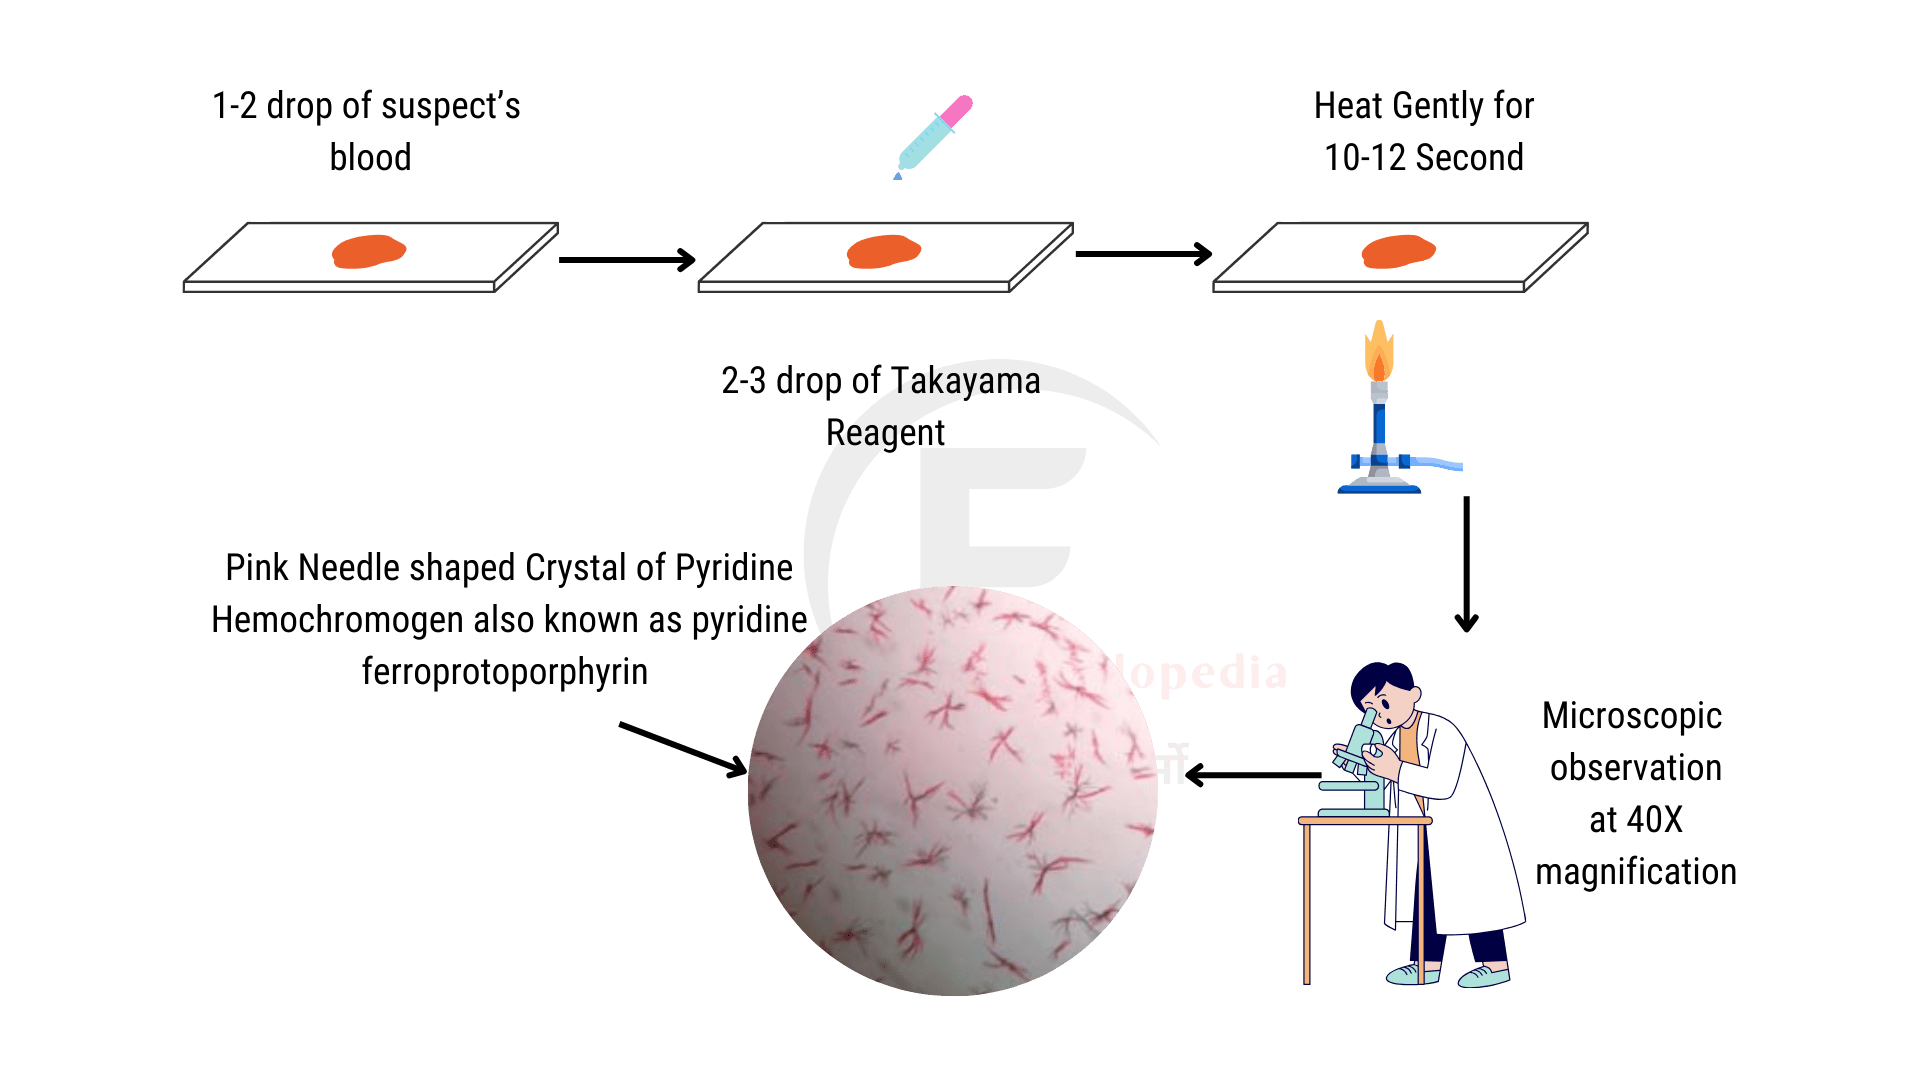
- A small portion of the suspected bloodstain is placed on a glass slide.
- Reagent Application: A few drops of Takayama reagent (containing pyridine, sodium hydroxide, glucose, and water) are added to the sample.
- Heating: The slide is gently heated, usually on a hot plate or by passing over a flame.
- Crystal Formation: As the sample cools, pink needle shaped crystals of pyridine hemochromogen/ pyridine ferroprotoporphyrin form if hemoglobin is present.
- Microscopic Examination: The slide is examined under a microscope for the characteristic pink needle shaped crystals.
Limitations
- Expertise Required: Requires microscopic examination and the ability to recognize the specific crystals.
- False Negatives: Extremely degraded samples may not produce the crystals effectively.